Matt Burgess Biography
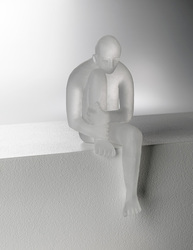
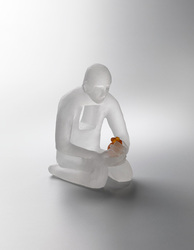
Matt Burgess (Aust, 1985) completed a degree of Visual Arts (Specialisation) at the University of South Australia. He majored in glass and minored in jewellery. His glass work explores the human form, looking at the human condition. He casts his glass using the lost wax technique.
Experience
2009
Teaching assistant to Glass department, South Australian School of Art Jam Factory Studio Tenant Assistant to David Reekie (master class), South Australian School of Art
2008
Teaching assistant to Glass department, South Australian School of Art Assistant to Janet Laurence, Adelaide Biennial, Fringe Festival, Handle With Care, Art Gallery of South Australia
2007/08
Helpmann Academy, Optus Mentorship Scheme with David Reekie UK
2007
University of South Australia, Bachelor of Visual Arts (Honours) Craftsouth Internship, Wish List, Craftsouth’s annual members show
2004-06
University of South Australia, Bachelor of Visual Arts (Specialisation)
Solo Exhibitions
2013
Holding Breaths, Peter Walker Fine Art, Adelaide SA
2012
Fractured Fractions (small colossus), Michael Reid at Elizabeth Bay, Sydney NSW
2011
Momentous Estrangement, Peter Walker Fine Art, Adelaide SA
A Place of Home, Michael Reid, Elizabeth Bay, Sydney NSW
2010
Everything we breathe, Michael Reid at Elizabeth Bay, Sydney NSW
2008
Everything to this, Peter Walker Fine Art, Adelaide SA
Select Group Exhibitions
2011
Bibs and Bobs, International Visualization Centre, Adelaide SA
2010
Craftsouth members display, Adelaide Town Hall, Adelaide SA
Melbourne Art Fair, with Michael Reid at Elizabeth Bay, Melbourne VIC
Melbourne Art Fair Sydney Preview, Michael Reid at Elizabeth Bay, NSW
Wish List, Prospect Gallery, Prospect, Adelaide SA
2009
Paper Scissors Rock, Hahndorf Academy, Hahndorf SA
Furnace, Tasmanian Craft Fair, TAS
Wish List, Adelaide Central Gallery, Norwood, SA
2008/09
30th Anniversary Ausglass Exhibition, Carnegie Gallery, Hobart TAS
2008
Dividing Lines, Urban Cow, Adelaide SA
Quartet, Adele Boag, Adelaide SA
Open Slather, Ausglass Conference member’s show, ANU Student Gallery, Canberra ACT
2007
Nexus Window Space, Adelaide SA
Small Colossus, Chesser Street Gallery, Adelaide SA
Puncture, Kaurna Gallery, Third Year and Honours graduate exhibition, University of South Australia, Adelaide SA
Refill, Aroma Café City West, Adelaide SA
Impending Doom for the HMS Black Sun, Fringe Festival, Spank Studio, Adelaide SA
2006
Prelude, Kaurna Gallery, Third Year and Honours graduate exhibition, University of South Australia, Adelaide SA
Sculpture and Form, Peter Walker Fine Art, Walkerville SA
Maestros and Apprentices Auction, Helpmann Academy, Adelaide Convention Centre, Adelaide SA
DB509, SALA Festival, Adelaide Arcade, Adelaide SA
A4 Play, Adelaide SA
2005
Cast, Kaurna Gallery, Adelaide SA
Publications
2011
Christmas Essentials 2010, ‘A Brush With Desitiny’, article by Gary LaPersonne.
2010
Adelaide Matters, May 2010, ‘Treasure Trove’, AM People
2009
World Sculpture Magazine, 2009 (Autumn), ‘Speaking Through Hands’, article by Christine Nicholls
Update Arts Magazine, March 2009, (Issue # 63), ‘SASA Students get back to their glass roots’, article by Chris Bull
2006
The Advertiser, Arts Section, Tuesday, November 28, 2006 article by Samela Harris
Entropy, University of South Australia student magazine, October edition
Adelaide Matters, November, 2006, (issue #79), article by Catherine Bauer
Grants and Awards
2012 The Alice 2012 Art Prize Finalist
2011 Carclew Youth Arts Project and Development Grant
2008 Helpmann Academy Project Support Grant
2007 Helpmann Academy Project Support Grant
Nominated for Design Now, Object Gallery
2006 Nominated for ADAFS prize, University of South Australia
2005 Dean’s Merit List, University of South Australia
2004 Dean’s Merit List, University of South Australia
Membership
2010 Craftsouth (Accredited Member)
About the Lost Wax Technique
Lost Wax Technique For Glass CastingI melt a hard wax in a bain-marie and add thirteen percent paraffin oil. This helps to make the wax more malleable. After the wax has melted and the paraffin oil is mixed in, I pour the wax into a baking pan and let it set for a couple of hours.
Moulding the wax is one of the most time consuming aspects of this technique, well it’s the most labour intensive on my behalf. It takes me approximately five – twenty hours to mould one figure. The scale of the figure does not determine the time taken; it is the way the figure is positioned.
After the figure is created I attach a reservoir, which is a cone shaped like addition to the figure. This is for the glass to pour into once it is set in the mould; I need to attach this to the figure now, as it is made out of wax too. I usually attach it to the bottom of the figure as this is the best angle for the glass to pour into. Once the figure is created, I clean it up with a lite flame to smoothen the surface of the wax. This eradicates my fingerprints and other surface marks.
This is the stage where I attach sprews to the figure to make a plaster / silica mould. The sprews are thin, approximately three millimetres wide. I roll wax to make these. Sprews are attached to the figure and reach the outside of the paster / silica mould. They are for oxygen to pull the glass in hard to reach areas in the mould.
Before I can make the paster / silica mould I need to build a wall, for the paster /silica mix. The walls are made of wood, and are held together with clamps. They are built around the figure. I fill in any gaps with clay so that the plaster / silica does not leak while it sets.
Okay, now is time to make the plaster silica mould!! I fill half a bucket with water and add one handful of paster and one handful of silica. I add a handful of each until it reaches a consistency I am happy with. I pour the mixture into the container I made with the wall. I generally leave the plaster / silica for half an hour just to let it set, and then remove the walls and clay. The end result of this is a rectangular white solid box with a wax figure inside.
I place the plaster / silica mould in a drying cabinet over night to get out the moister out.
After leaving the mould in the drying cabinet I melt out the wax figure, using the steamer. This usually takes about 20 minutes.
The mould is now ready for the kiln. I place the mould in the kiln, and put a flowerpot with a lead crystal glass in it ready for the glass to pour in. The reservoir I attached to the mould goes all the way to the outside of the plaster / silica mould. I place the mould with the reservoir facing up. The flowerpot hole is in line with this hole so the glass can pour in at a steady rate. The reservoir is about five centimetres wide.
I leave the mould in the kiln for up to four days. It takes this long as the glass needs to go up in temperature at a certain rate and cool down at a certain rate. If the temperature drops at a rapid rate the glass will stress and crack. If not straight away, later on.
When I pull the mould out of the kiln, I leave it for a day before I crack the mould open. This is because there is still heat within the mould and glass. Not much, but it is enough to crack the piece.
After the figure is out of the mould, I clean all the remaining bits of plaster / silica off the glass. I can now cold work; I cut the reservoir off to begin with. I use a variety of cold working equipment to clean the figure and to achieve a finish I would like to achieve. This can take quite some time.


